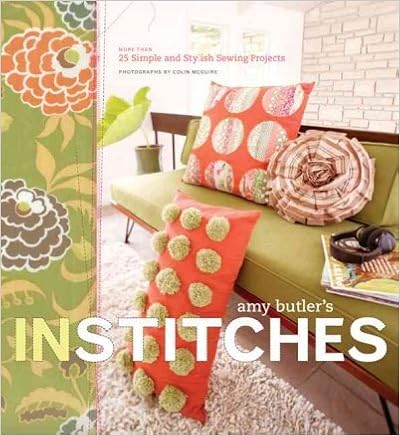
Amy Butler's In Stitches: More Than 25 Simple and Stylish Sewing Projects
Amy Butler
Language: English
Pages: 176
ISBN: B0073WTXVK
Format: PDF / Kindle (mobi) / ePub
A leading designer brings a fresh, stylish approach to the craft of sewing in a collection of more than twenty-five creative projects, ranging from floor cushions to handbags, that include detailed pattern sheets, step-by-step instructions, fabric tips, a
Title: Amy Butler's in Stitches
Author: Butler, Amy
Publisher: Chronicle Books Llc
Publication Date: 2006/08/03
Number of Pages: 176
Binding Type: HARDCOVER
Library of Congress: bl2008002048

Weekend Knitting: 50 Unique Projects and Ideas
Graphic Knits: 20 Designs in Bold, Beautiful Color
More Teach Yourself VISUALLY Jewelry Making: Techniques to Take Your Projects to the Next Level
The Flower Workshop: Lessons in Arranging Blooms, Branches, Fruits, and Foraged Materials
Knit Wit: 30 Easy and Hip Projects (Hands-Free Step-By-Step Guides)
The fold of your fabric, lay your pattern piece so that the edge to be placed on the fold is even with the folded edge of your fabric. Once this pattern piece is cut out of your fabric, open it up to make one full panel. Step 2. Attach the top and bottom panels together. a. With Right sides together, pin the bottom raw edge of the top panel to the top raw edge of the bottom panel. Attach the panels by stitching a 1/4″ seam across the matched raw edges, backstitching at each end. Serge or zigzag.
Finished in step 6. NOTE: Now is the time to make adjustments to your measurements, if necessary. On a patchwork panel you can always add more pieces to fill in any length or width you might need, or trim down the length and width to meet the measurements required. Step 10. Mark the placement for the bobbles on the foundation. a. First, measure and mark the placement for the bobbles across the width of the foundation. Be careful at this point to fold the flap up away from the foundation to.
Pocket lining: 13″ wide × 71/2″ long • Cut 1 bottom lining panel: 3″ wide × 9″ long FROM THE CANVAS • Cut 1 front panel: 13″ wide × 101/2″ long • Cut 1 pocket panel: 13″ wide × 61/2″ long • Cut 1 top panel: Use the top of the back panel pattern piece provided in the pocket at the front of this book. (Fold the back panel pattern piece at the fold line and cut around the top part of the pattern to make the top panel.) FROM THE TIMTEX INTERFACING • Cut 2 panels: 8″ wide × 10″ long • Cut 2.
Flaps on the fold: Use flap pattern piece. FROM THE HEAVYWEIGHT FUSIBLE INTERFACING • Cut 2 flaps on the fold: Use flap pattern piece. * To cut your pattern piece on the fold of your fabric, first fold the fabric with Wrong sides together and the selvage edges aligned. Then lay your pattern piece so that the edge to be cut on the fold is even with the folded edge of your fabric. Once the piece is cut out, open it up to make one full panel. c. In order to keep your pieces organized, mark each.
In this book, type http://www.chroniclebooks.com/landing-pages/pdfs/Amy_Butler_In_Stitches-Patterns.pdf into a web browser from which you can print (e.g. desktop or laptop computer connected to a printer). To print patterns on 8 1/2-x-11-inch/A4 paper from your home computer, please follow the following “tiling” instructions. Tiling will allow you to split the large pattern page seen on screen across multiple 8 1/2-x-11-inch pages, which you can then assemble into the large pattern page to use.